 |
| Great-Circle Map Centered on W8WWV |
Greg Ordy
I have to begin by apologizing for the poor quality of the pictures on this page. They were taken back when I was laying out the array, which was in October of 1999. At that time, I used a video camera to record construction as opposed to a digital still camera. I thought that the picture quality of a captured frame was close to the quality of a still camera. Unless you have a very poor still camera, that isn't true, and these pictures prove it.
On this page I would like to describe the construction of the array from the perspective of site preparation and the ground radial system. The details of each element are described on another page.
Antennas which can be physically rotated have the desirable property that they can point in any direction. This continuous rotation is preferable since it provides for skewed paths, and long paths, and all paths. When an array is built from fixed location verticals, the directions that it can point in are constrained. Part of the design process is the consideration of how the fixed directions cover the major portions of the planet.
One of the reasons that we are building an array, especially for the lower bands, is to have a very directive signal response pattern which improves the signal to noise ratio on reception. The more constrained and narrow the pattern, the better. The only factor that works against a narrow pattern is the interaction with a relatively small number of fixed directions. The danger is ending up with gaps in coverage. You cannot point your antenna in a desired direction, and the response in that direction is very low.
The most popular expression of the directionality of an antenna is its 3 dB beamwidth. This is a value, measured in degrees, which describes the arc where the signal is no more than 3 dB less than the maximum. Beamwidth can be measured in both the vertical (elevation) and horizontal (azimuth) planes. On this page, I'm talking exclusively about beamwidth in the horizontal plane. The azimuth 3 dB beamwidth. The signal pattern is usually centered on the primary direction. The 3 dB beamwidth is equally divided to each side of the direction of maximum signal.
It's usually also true that the directional increment or step size between fixed directions is equal as you go around the horizontal plane. If an array has 2 directions, they are 180 degrees apart. If an array has 4 directions, they step by 90 degrees. In the case of the Hex Array, with 6 directions, they step 60 degrees.
You can run into problems if the beamwidth is substantially less than the step size. This suggests that there are directions where you simply cannot have a strong signal. If the beamwidth equals the step size, the signal response will vary between maximum and 3 dB less than maximum as you rotate around the compass.
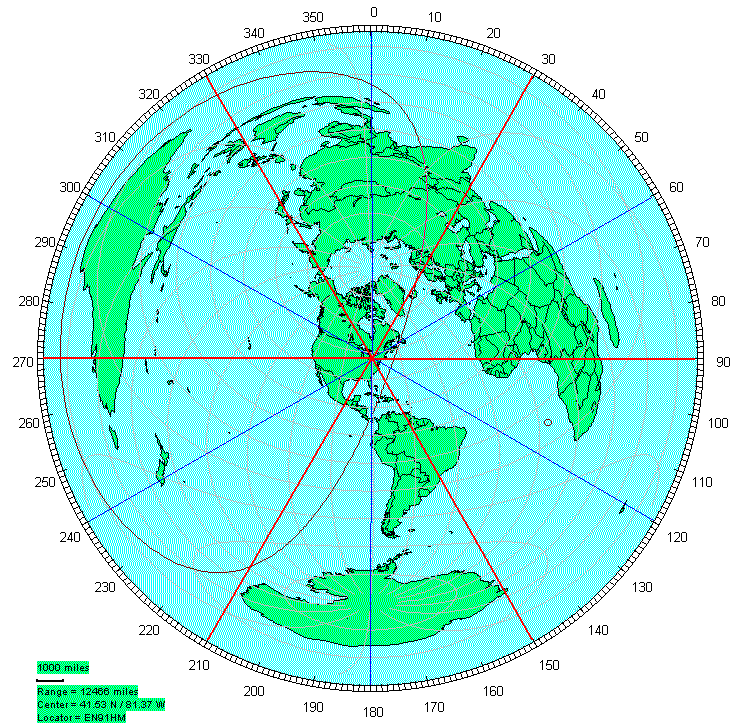
When considering where to point an antenna, the easiest map projection to use is the azimuthal-equidistant projection, not the more common Mercator projection. The azimuthal-equidistant projection is also known as the great-circle projection. The projection has the property that it is correct only for the point which is the center of the map. You must redraw the map for every possible point that you want to consider. A straight line on that projection is the shortest distance between two points, assuming one point is the map center. Airplanes and radio waves tend to follow the great-circle routes, since they are shortest path. Radio waves, on occasion do follow skewed paths, or even the long path, which is the direction 180 degrees away from the short or great-circle path.
A program which can be used to draw great-circle maps is called GCM, by Roger, SM3GSJ. I drew the following map centered on my location. The red and blue lines were added as a second step in a paint program.
|
|
| Great-Circle Map Centered on W8WWV |
The red lines indicate the 6 maximum signal directions of the Hex Array. The blue lines are equidistant between the red lines, and will be the directions of minimum signal strength. The degree of signal drop at the minimum will be a function of the beamwidth. On 40 meters, the 3 dB beamwidth computed by EZNEC is approximately 60 degrees, the same as the step size. So, on 40 meters, the signals along the blue lines will be 3 dB down from the signals along the red lines. On 80 meters and especially 160 meters, the beadwidth expands, and the minimum drop is much smaller, between 2 dB and 1 dB respectively.
Why did I pick this orientation? The primary reason was that this orientation aligned well within my available space. But it was still necessary to check that the main directions covered important parts of the planet. Conventional wisdom suggests a 45 degree angle from my location (and most of the United States) to cover Europe. My closest direction is 30 degrees, which does shoot a little north of Europe. On the other hand, Europe is relatively close to my location, and signals tend to be strong and not requiring every drop of gain. The 30 degree angle helps me with the far more difficult countries such as India (VU). I have a direct shot at Japan (JA), and most of South America. Africa is also split by an array direction. Eastern Australia (VK) is better served than the western side of the country. Asiatic Russia (RA, UA), Mongolia (JT), China (B), and lands south of China fall under a blue line. Seems to be a large planet, full of people.
One implication of the blue lines is that they are exactly between two array directions, and therefore signal strength along the lines should be the same on either the counterclockwise direction, or the clockwise direction. Usually, it's very obvious what direction produces the strongest signals. As you get near the blue lines, the difference diminishes. Two good test countries are Portugal (CT) and New Zealand (ZL). Each country is nearly on top of a blue line. Indeed, the signals are nearly identical on the two adjacent directions. If anything, signals are a little stronger on the clockwise direction. Part of the explanation is that the true directions of the array are actually about 3 degrees greater than shown. I live on a street which runs at 89 degrees, almost exactly due east. When I built the array, I tried to align the array with the street in order to leverage its alignment onto the array. More recently I have made additional measurements with a compass and concluded that I am probably a few degrees clockwise of my intended alignment. I still consider the array directions to be 30, 90, 150, 210, 270, and 330 degrees.
The array site is over my septic tank leech field. I used my Kubota tractor to clear the area down to bare dirt. I attached various implements to level out the small hills and valleys left from the installation of the leech field. I was able to drag a tractor in the hobby of amateur radio - not bad. The area was open field, with a few very small trees, mainly crabapple trees. I removed any tree in an important location, but otherwise tried to leave them alone. I've not noticed any interaction with the array, and they actually do a good job of softening the array visual impact by breaking up the view.
As described on my Background and History page, the array, including radials, is 138 feet wide (east to west), and 160 feet tall (north to south). The area was directly next to the lawn, but not part of the lawn. I never had to worry about the radials working their way into the lawn. Over the last few years, the radials have indeed tended to bury themselves, but not all of them. I do cut the weeds around the array, which naturally encourages the growth of grass. I keep the mower deck raised, however, so I'm never too close to the ground (and the radials).
The next picture shows the site after it was cleared, but before any antenna work was done. Please click on the picture for a larger view.
 |
| Cleared Site |
The actual verticals are described on another page. Here are a few pictures looking at the verticals as a set. Please click on a picture for a larger view.
 |
 |
 |
| Tubing | Lower Sections | Lower Sections and Whips |
The left picture shows the two boxes that contained the materials necessary to build 6 elements. The middle picture shows the 6 lower sections. The right picture shows the 6 lower sections along with their matching whips. All that's missing are the traps that go between the lower sections and the whips.
 |
 |
 |
| Traps Under Construction | Traps in the Field | Trap on a Vertical |
The left picture shows the coaxial traps under construction. The traps are described on another page. They are constructed from RG-213 coax wound on a 4" plastic pipe. The pipe sections are trapped between plastic end caps which are mounted on a fiberglass tube. The middle picture shows all 6 traps in the field, right before they were installed on the elements. The right picture shows a trap on a vertical. The lower section telescopes over the fiberglass, and the whip telescopes into the fiberglass.
It is usually the case that we want to step the array through all of its possible directions. We want the same performance in all directions. In order to obtain the best performance in all directions, the array must be symmetric. This can be a challenge.
Symmetry takes many forms.
The vertical elements ideally should be identical. They should have identical ground systems so that their self-impedance values are all the same. They should all be resonant on the same frequency, and have impedance changes as a function of frequency which are the same.
The set of elements should be symmetric with respect to the physical center of the array. I started off my array with a set of 19 stakes which represented the elements, and the center of the array, and the outer vertices of the radial field. This creates a set of points which should all lie on various straight lines through the array. It was easy to walk around and verify that everything lined up. It's also helpful to have a long measuring tape, such as a 100 foot tape used for surveying. If you are making a square or rectangular array, you can measure diagonals as a cross check for 90 degree corners.
By using stakes, and then checking all of the straight lines through the array, and using a 100 foot tape to verify distances, I would estimate that I ended up with stakes within an inch of their intended locations. This is especially true for the inner points of the elements and the center. I suspect that the greatest amount of error was introduced when I pulled up a stake and made the first plunge with the post hole digger. The only tricky part of this process was making sure that none of the elements were located directly over a buried leech field line. These lines run under the entire array, and are spaced at 4 foot intervals.
Without any basis in experimentation or theory, I'm going to claim that the location of the elements should be within 6 inches of their desired locations. At some point, the spacing error will make the mutual impedance values asymmetric across the array, and it will be impossible to rotate the array without pattern and SWR bumps. The tolerance will be a function of frequency, becoming larger as the frequency drops.
A compass is essential if you are trying to align the array with a particular direction. Some compasses are specially made to allow you to easily to determine the angle of your line of sight. Don't forget to compensate for the difference between the magnetic north pole and true north pole at your location.
The overall environment of the array should be homogeneous and symmetric. This is often times the hardest part, since it is usually out of our control. Is one side of the array next to a building, or a metal gutter, or a power line? How close are trees? How close are other radio antennas?
I was lucky enough to be relatively far away from all objects except for trees. If the trees interacted with the array, it should be apparent as shifts in impedance values. To the best of my measurement ability, I have not seen any interaction with trees. From time to time various sources do claim that trees and antennas can interact. This should be a function of moisture in the tree, which is probably a function of the season. Around my array, almost all of the trees lose their leaves in the winter. I would think that leaves tend to be a major storehouse of moisture. Winter months are also when the lower bands are most used, so Mother Nature is trying to cooperate with my antenna plans as best as she can. The amount and level of ground water can also change over time or seasons, and may influence the ground conductivity characteristics. My array is over my septic tank leech field, which I hope keeps moisture in the ground at all times. My ground is constantly wet all winter, due to snow or rain. The issue here is not the absolute conductivity, but whether it is changing so drastically within the local region of the array that it impacts the array symmetry.
Another aspect of the symmetry is elevation. Does the array sit on the side of a hill? What sort of elevation changes occur within and around the array?
I may appear a bit obsessed with making the array symmetric. To the extent that it's true, it's because it's so difficult to fix symmetry mistakes after the fact. Once the ground is covered with radials, it's hard to start moving a vertical by a few feet. It's sort of like the classic woodworker's saying: measure twice, cut once.
If you do not have a very symmetric array, the pattern will change from direction to direction. That is usually not a major problem. The problem is that the feed point SWR changes from direction to direction. Small changes are also not a problem, but if the SWR shifts from 1 to 3, for example, as you change directions, your radio will see a different load impedance based upon the direction. At the extreme, the radio will reduce power in response to a high SWR. More subtle is that your amplifier tuning might change based upon the load. Life will be simplest if the array impedance is the same in all directions.
Ground radials could be the subject of an entire book, and probably have been, many times. I don't intend to go over all of that material here. Consult the ON4UN book or the Gehrke articles for more information. A recent QST article (Optimum Radial Ground Systems, by Robert Sommer, N4UU, QST, August 2003) has presented a formula based upon the historic Brown work which determines the best way to divide a specified length of wire into a set of radials.
After considering all of the factors, I decided upon 60 radials for each antenna. According to the various sources, using more radials would not be an improvement unless they were also longer. In other words, I should make the radials longer before I start to add more. It turns out that the 60 radials also made sense given the inherent symmetry in the hexagon.
The following diagram shows the array center (blue), the 6 elements (red), and the outer perimeter of the radial field (black). The spacing between points is 40 feet. The north direction orientation is shown. The clockwise element numbering scheme is the one that I actually use when considering the array. Sadly, some of my pages use a different numbering scheme.
 |
| Hex Array Element Layout |
After a trip down to the local electronic surplus store, I came back with a number of spools of insulated wire. I had larger gauge (#12/#14) stranded wire with yellow and purple insulation, and over two miles of smaller gauge (#20) stranded black wire. I had four spools of black wire, each 3000 feet long. For no particular electrical reason, but to make it easier to follow the progress of the radial installation I laid out the above pattern using the yellow and purple wire. This initial layout tied together all of the elements, and gave each element 12 radials, at the correct angular spacing. The outer perimeter was established with bare fence wire. Point F, as an example, on the outer perimeter, is the point where radials coming from elements 3 and 4 meet, and attach together, and terminate.
With these 12 radials established with colored wire, I needed 48 more radials to reach the total of 60. This means that 4 radials (48 / 12) must be located between each of the 12 major radials. This is where I switched to the smaller gauge black wire, for the remaining 48 radials. I threaded a metal axle through the four spool hubs and ran the remaining radials in groups of four. Here are some pictures of the process. Please click on a picture for a larger view.
 |
 |
 |
| Radial Wire | Radial Hoops | Tees |
The bulk wire is shown in the left picture. As I recall, each spool was $10 (USD), so the radial cost was no more than $80. I even have wire left over. At each element and the center of the array I made up a copper hoop which is the attachment point for the radials. They are shown in the middle picture. Each hoop is made from 5/16" copper tubing. The tubing is run through holes in legs made from 1/2" copper pipe. All joints are soldered. The legs are 1 foot long, and are pushed into the ground to anchor the radials. Each hoop was positioned around an element or the center point. The hoop radius is 1 foot. During installation, the hoop legs were partially pushed into the ground, leaving the hoop a few inches above grade. The radials were attached to the hoops by removing a few inches of insulation and wrapping the radial wire around the hoop. The radials were soldered to the hoop, and the solder joint was coated with a liquid electrical tape product. Each hoop has two additional wires which come up from the hoop which are the ground connection for the element or center point. When installation was complete, the hoops were pushed down to the ground level.
The right picture shows a T terminal made from a short length of tubing inserted through a hole in a 1 foot section of 1/2" pipe. These terminals were inserted at the points labeled A through L. The perimeter wire runs across the terminals, making a wrap around the cross arm to hold the wire in place. Earlier on this page I mentioned having 19 stakes when laying out the array. The 19 stakes are the 6 elements, the center point, and the 12 perimeter points, A through L. Although my diagram is a little sloppy, it should be possible in the real array to site through a large number of lines consistent of 3, 4, or 5 of the 19 points. Stakes were moved so that all of the lines were straight, and so that the spacing between points was 40 feet.
 |
 |
| Radials on a Hoop | Mass Production |
The left picture shows the radial wires attached to the hoop. The right picture shows the four spools of #20 gauge wire on the center axle. The four ends were stripped, twisted together, and soldered to the hoop. I would then pick up the axle, and walk backwards away from the hoop, exposing four radials at once. When I got to the radial termination point, each wire was cut, and attached to the appropriate wire. The attachment was again solder and a coating of liquid electrical tape. I eyeballed the spacing between the radials. Because of the layout of the 12 major yellow and purple radials it was easy to see the section which was the termination for the four black radials. The radials were equally spaced along that section.
It's hard to imagine an array where the radial fields from the individual elements would not overlap. The question becomes, what do you do at the overlap? The ON4UN book, and many other sources, suggest that a bus system should be used, so long as we are talking about a large number of non-resonant ground radials. Figure 11-99 of the third edition of the ON4UN book has a number of example drawings.
In the Hex Array, 1/3 of the radial system is unique for a given element, 1/3 overlaps the neighboring clockwise element, and 1/3 overlaps the counterclockwise element. Consider element 1 in the diagram. A diamond shape is formed by the element and points L, A, and B. In this outer region all radials attached to element 1, and no other element. This is 1/3 of the radial field for element 1. Moving around element 1 in a clockwise direction, the next 1/3 of the field overlaps radials for element 2. This is the diamond formed by element 1, point B, element 2, and the center point. A green line is shown going down the middle of the diamond, from the center point to point B. This green line is the location of the bus wire. All radials in the region, whether from element 1 or 2 attached to that bus wire. There is a similar bus wire for the region shared by elements 6 and 1. This completes the radial field for element 1. Similar bus wires exist for the other elements.
Part of what I wanted to achieve with the radial system was a stable loss resistance. It's generally the case that fewer radials makes the loss resistance more sensitive to moisture content in the soil. A very good article on this topic is: Short Ground Radial System for Short Verticals, by Jerry Sevick, W2FMI. This article is published in the appendix of Building and Using Baluns and Ununs, although I believe it appeared in other publications as well. He presents several graphs that show how changes in seasonal rainfall alter the ground conductivity, and, therefore, the ground loss. This would be like putting a variable resistor with a value of a few Ohms at the base of each vertical, and turning the knob based upon recent weather. Since the drive impedance of most verticals in an array is already low, the upset to the ground loss resistance will most certainly upset the array current distribution and the overall SWR back to the radio. Having a lot of radials (60 or more) will make the ground system loss lower, and more stable. In the context of an array, that stability is as important as the low loss.
Before I finished the radial system, I added a number of radials not otherwise discussed to the center point. My thinking was that if the array project didn't work out I could revert to a single vertical at the center point of the array. I wanted some additional radials which were specific to the center point.
Estimates of the ground loss of the radial system are made on the element description page.
The guying of each element is described on the element description page. Each element has three guys. The guy lines terminate in bronze clip hooks which are attached to metal anchors screwed into the ground, or the center support post. All 6 elements tip towards the center of the array, and have a guy which runs to the center of the array. The remaining two guys run out to the perimeter of the array. Here is a picture of the top of the center support post. Please click on the picture for a larger view.
 |
| Guys at the Array Center |
A ring is screwed into the top of the post, and all 6 center guys clip onto the ring. With respect to the previous diagram, the guys for element 1 terminate at the center post, and at points L and B. The guys for element 2 terminate at the center post, and points B and D. Points B, D, F, H, J, and L, which are on the perimeter, but not on a center radial line with an element, support the attachment of two guy lines. The other 6 points, A, C, E, G, I, and K, are on the opposite side of an element with respect to the center. While those points do not support guy lines they do have a metal anchor screwed into the ground right beyond their location. The anchor is needed to support the backstay line on the raising fixture. The raising fixture is detailed on the element description page.
Some sources state that ground wires must be run away from an element, a true radial wire. Other sources say that a grid system is good. Chicken wire makes a good grid system. The claimed ideal ground is a solid sheet of conductor, such as copper. I don't know which theory is true, and if any are much better than the others. I have obviously implemented a form of grid system, since the various cells in the hexagon are bonded together.
As I understand the thinking process, the purpose of radial wires is to collect return current and keep it from having to flow through the lossy ground. Grid wires have the undesirable property that there are many current paths through the grid, each with a different length, and, therefore, delay in returning the current. I could be convinced to believe that it's important to return the current at the right time (phase). Is it possible that by adding wires that are not radial you can degrade a radial system? That would be a shame. And goodness knows that if you added many wires you would slowly approximate that solid sheet of copper, which is claimed to be perfect.
If I were to do it again, I would be tempted to lay out separate radials for each element that are only connected at the base of the element. While there would be a tremendous overlap of wire at the center of the array, it would keep all of the radial fields distinct. I would not use the bus wire system. Of course eventually the coax cables from the elements would meet at the center control box, and have their grounds all connected together. That is unavoidable. Would that be creating a problem?
In the end, I have to believe that the only important measure of a radial system is its loss resistance at a particular frequency. If there is a problem due to missing or inappropriate current paths it will all be manifested in the loss resistance. My loss resistance appears reasonable for the size of the radial system, so I can't believe I'm making a horrible mistake.
Back to my Experimentation Page