 |
| Data Logging Dialog Box |
Data Logging
Data logging is used to capture an arbitrary amount of S Meter data and save it in a file. Data logging operates in parallel with the normal operation of the program. Data produced by S Meter Lite can be post-processed by a wide range of programs. The data is saved in the popular .csv (comma separated value) format. This format is directly imported by spreadsheets such as Microsoft Excel™. S Meter Lite does not process or analyze logged data. It simply collects data which can be used by another program.
The .csv format is a text-based format. A line contains a single data sample, where the fields are separated with the comma character. In addition to the sample lines, S Meter Lite adds several control lines when data logging is started or stopped.
When you are considering data logging, you will have to make several decisions. The first is the file name. Although S Meter Lite has a default file name (SMeterLog.csv), it's usually the case that you will want to select a more appropriate file name and folder. S Meter Lite only appends data to a file. Existing data is never truncated or deleted. In the extreme, you can log all data for all time in a single file. Each logging session will simply be added to the end of the file. Since the sections are time-tagged (even if the data isn't), you can sort it all out.
The next choice is the sample period. When the program is running, the S Meter data is always being collected from the radio at a rate of 20 samples per second. For logging purposes, it is not necessary to save all of this data. Periodic samples which are the arithmetic average of all of the data over the period are sufficient, and keep the data set size from growing into a large file.
The period can be set to one of ten built-in values in the range from 1 second to 30 minutes. The period choice will be influenced by the nature of the intended measurement, and the amount of data which can be processed.
The next consideration is the format of the logged data. If desired, each sample can be time tagged with the hour, minute, and second of the sample. The time is always the local computer time (not UTC). The data can be written in up to four different formats. For each of the selected formats, it is possible to add the minimum and maximum data values discovered during the sample period. This is in addition to the average value, which is always written if the format is selected.
The Data Logging Dialog Box is used to control all aspects of data logging. You can display the dialog box by either typing the Ctrl+L (the control key and the L key) combination, or, right clicking over the main window and selecting the Log choice from the context menu. Here is a picture of the dialog box.
|
| Data Logging Dialog Box |
The Enable Data Logging control is the master on/off switch for logging. If the control is not checked, logging is disabled. If the control is checked, logging will begin when the Run button is clicked.
The Log File Name edit control holds the name of the log file. You can either type a name directly into the control, or, click on the Browse button to bring up the standard system dialog for locating and naming files.
Select the desired logging period from the drop-down list control. Provided settings are:
The Data Logged group box holds the controls which specify which data is logged.
When the Time control is checked, the time that the sample is created is logged. The next four controls enable or disable logging in the different formats. You must specify at least one format, but you can specify more than one. If you do specify more than one, all of the data will be placed on one line, in the left to right order of the controls. The final control in the group box is the Min/Max control. When checked, the minimum and maximum data discovered during each sample will also be logged. That data is placed immediately to the right of the corresponding average data value.
If you were to check off all controls, each line would have 13 data values, the time, followed by triplets of average, minimum, and maximum data for each of the four formats. The formats are described in a future section.
If the Flush file after each entry control is checked, data will be flushed to the file as soon as it is created.
The Syn. dB/S Unit control selects the number of dB used for each S Unit in the synthetic dB format.
Whenever the Data Logging Dialog Box is displayed, the program will stop running.
The data file is only open when S Meter Lite is running. The file is opened for appending when the Run button is clicked. This means that S Meter Lite will never destroy or overwrite any existing data, it will only add data to the end of a new or existing file. The logged data file is closed when the Stop button is clicked.
By default, the data written to the log file is buffered within the program. This is usually done for the sake of efficiency. In this case, logged data is never written to the file at a rate greater than one record per second, and the amount of data written is a single line of text. This means that the efficiency argument really does not apply. There are several potential problems with buffering. Since the data remains in the program until its internal buffer is full, events such as a system crash will cause the data to be lost. While the data is within the program, and not in the file, it cannot be read by other programs. For these reasons and others, it can be useful to disable the normal file buffering mechanism.
The Data Logging Dialog Box includes a check box control which can be checked to disable flushing. The only circumstance where flushing must be disabled is when you wish to read the data file while it is being written. When doing long term data collection it is usually desirable to check the data from time to time in order to monitor the partial results. Disable buffering in this case.
This section details the data file format. When the Run button is clicked, two lines are written to the file. The first contains a begin logging indication, the current time, the radio being used by S Meter Lite, and the number of radio samples which are averaged to produce a logged sample. The second line describes the data while will be logged. When the Stop button is clicked, logging stops, and a entry is made in the log file. It consists of a end logging indication, and the time when logging was terminated.
Here is the listing of a data file example.
|
"+++","Sun Jan 19 10:39:14 2003","IC-756PRO","20" "Time","S Unit","SyndB", "10:39:15",9.78,7.78, "10:39:16",10.08,10.83, "10:39:17",10.13,11.25, "10:39:18",10.13,11.25, "10:39:19",10.13,11.25, "10:39:21",9.56,5.56, "10:39:22",5.25,-22.50, "10:39:23",3.86,-30.86, "10:39:24",4.29,-28.29, "---","Sun Jan 19 10:39:25 2003" "+++","Sun Jan 19 10:39:55 2003","IC-756PRO","40" "Time","SyndB+", "10:39:57",2.22,-2.50,4.44, "10:39:59",4.44,2.22,8.33, "10:40:02",5.00,-6.43,11.25, "10:40:04",7.78,4.44,12.92, "10:40:06",11.67,7.78,13.75, "10:40:08",10.00,0.00,13.75, "---","Sun Jan 19 10:40:10 2003" |
|
Data File Example |
The first two lines are examples of what is produced when the Run button is pressed. The string "+++" is used to identify the start of a logging session. There is a matching "---" string which indicates the end of a logging session. The "+++" is followed by the time that logging was started. This is followed by the radio name, and the number of S Meter values which are averaged to produce a logged reading. In this example, the value is 20. This means that the 1 Second period setting was used, since the radio sampling rate is 20 samples per second.
The second line describes the logged data. The string "Time" indicates that the time will be logged, and that it will be the first data on a line. The strings "S Unit" and "SyndB" indicate that the S Unit and synthetic dB formats will be logged.
Lines 3 through 11 are actual data. The time tags show the 1 second sampling period. The time tag is followed by two data values, the S Unit value and the synthetic dB value.
Line 12 was created when logging was stopped.
I changed the format to be just the synthetic dB format, but I enabled the Min/Max feature. I clicked Run again to start logging. The format string "SyndB+" indicates that the Min/Max data is being added to the file. The additional + character will be added to each format name when Min/Max logging is enabled.
Each data line consists of the time, followed by three data values which represent the synthetic dB average, minimum, and maximum values.
Four data formats are provided. The first format is the raw data. This is the 8-bit data which is taken from the radio. There is no further interpretation.
The S Unit data format is a floating point number where S0 to S9 map to the values 0 to 9. In order words, S5.7 would be represented as 5.7. The question becomes what to do with the values above S9? S9+10 is mapped to the value of 10. S9+20 is mapped to 11. S9+30 is mapped to 12. S9+40 is mapped to 13. S9+50 is mapped to14. S9+60 is mapped to 15. In this higher region, the mapping is linear between points. So, for example, S9+25 on the S Unit scale would be logged as 11.5.
The dB format reflects the dB scale in the program. This is a floating point number. S9 has a value of 0. The scale ranges from -18 (dB) to +12 (dB). In many ways, this is the ideal scale. It's only problem is that the dB scale has a range of only 30 dB in S Meter Lite. This is too limited for many measurements, but if you are interested in the highest degree of accuracy, you should make sure that the dB scale is calibrated for your radio, and that you use this format. Strength values which are outside of the range are represented as the nearest range limit.
The final format is the synthetic dB scale. This is a floating point number. While this scale appears to be related to decibels, it really is based on the S Unit scale, which reflects the meter on the radio, which is usually not very accurate. S9 is mapped to a value of 0. S9+10 is mapped to 10, and this continues until S9+60 is mapped to 60. The question is what to do with the values under S9, which are presented in S Units. The popular belief is that each S Unit maps to some number of decibels. The often quoted value is 6 dB per S Unit. Now if there is one thing that this program does, it shows that this is largely never true. But, for the purposes of this format, S Units under S9 are mapped to constant width negative values. You can select the number of dB per S Unit.
Why do we need these formats? The fundamental problem is that the S Meter on a radio is labeled with two different units. The mythical S Unit flows into a scale which is usually labeled +10 to +60. We know that the +10 to +60 region is typically a reference to decibels, but the S Unit part is whatever the designer of the radio created. For logging purposes, we need to figure out a single number which spans both regions which we can put in the file. These four formats are several tries at coming up with something useful.
Once you have a data file, it's time for post-processing. While there are an endless number of programs that can be used to read and analyze the data, I find a spreadsheet such as Microsoft Excel™ to be very powerful and easy to use. Excel directly interprets a .csv file, and will place each sample on a single row, and each field will be placed in a separate column.
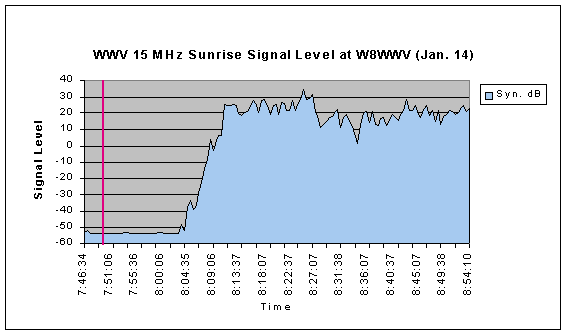
Here's a graph which I created with Excel. I was monitoring the strength of WWV at 15 MHz at sunrise. Shortly after sunrise, the signal rises from below the noise level to a very strong level. This change in propagation is clearly shown in this graph. I suspect that propagation study is one of application areas which can make good use of data logging.
 |
| WWV Signal Strength at Sunrise |
After creating the graph in Excel, I used the system Paint program to add the vertical red line which is my sunrise time on that day.
Last update:Sunday, January 19, 2003 11:06:21 AM
Back to the S Meter Lite Home Page