
Configuration and Calibration
This page describes two separate activities, configuration and calibration. Configuration refers to the process of adjusting S Meter Lite so that it operates correctly with your radio. Calibration is the process of adjusting the data tables that relate the raw data from your radio to the S Unit and dB scales in S Meter Lite.
Display the Configuration dialog box by clicking the Configure button on the main window. Here is a screen capture of the configuration dialog box.
The upper-most drop-down list box is used to specify the computer COM port that is connected to your radio via a serial interface cable. The Enable DTR and Enable RTS check boxes set the state of the COM port DTR and RTS lines when the program is running (and the COM port is open). Some ICOM radio interfaces obtain their operating power from the COM port control lines. If you have such an interface, you may want to enable either or both lines (the default). On the other hand, you may be using DTR or RTS to turn on your transmitter. In this case you should uncheck the appropriate control(s).
The Radio Selection group box is used to specify your radio. In the current version of S Meter Lite, only certain Yaesu and ICOM radios are supported. Select either the Yaesu or ICOM radio button to match your radio brand.
If you have selected Yaesu, then the drop-down list box to the right of the radio button will be enabled. Select your particular Yaesu radio model from the list. Yaesu radios do not require any further information, so this ends the Yaesu configuration process.
If you have selected ICOM, then the drop-down list to the right of the radio button, as well as the controls within ICOM Settings group box., will be enabled. Begin by selecting the radio model from the list. With ICOM radios, you have two additional choices. The first is the baud rate. This is the data speed between the computer and the radio. While there are several choices, what matters is that the radio and the computer are set to the same speed. On some ICOM radios it is possible to select a speed of Auto, meaning that the radio will adjust its speed to match the computer speed. While you can select baud rates under 4800 baud, these slower settings may not allow S Meter Lite to sample the radio at a rate of 20 times per second. S Meter Lite will sample the radio as often as it can, but the Update Rate, for example, will no longer follow the marked values.
The second ICOM choice is the radio address. This is an ICOM-specific concept which allows multiple radios to share a common computer interface. Each radio is identified by its unique and individual radio address. To further complicate matters, the radio address is specified as a hexadecimal (base 16) number. This just means that the decimal values of 0 to 255 are recoded as 00 to FF. ICOM radios have a default address. Unless you have more than one radio of the same model connected to the same computer interface, it is usually not necessary to change the radio address. As in the case of the baud rate, what matters is that the radio address configured into S Meter Lite matches the radio address set in the radio. S Meter Lite knows the default radio address for each model. You may wish to try that first. Consult your ICOM documentation for more information.
The Set Defaults button restores the baud rate and radio address to the S Meter Lite default values for the specified ICOM model.
The Do not demand command echo control is used with ICOM radios in very special circumstances. Normally, the ICOM CI-V bus echoes commands from the computer since there is a single wire for both directions of communication. If the connection uses two wires, where transmit and receive data is maintained on distinct wires (full duplex), check this box.
The S Unit Calibration button displays the Calibration dialog box for the currently selected radio. The phrase currently selected radio means the radio that is specified on the Configuration dialog box. This may or may not be the radio that is actually configured. Let's say that you are using a Yaesu FT-920 that is working just fine with S Meter Lite. For whatever reason, you wish to examine the calibration information or dB/S Unit Graph for an ICOM IC-756PRO. Click Configure on the main window to bring up the Configuration dialog box. It will indicate that a Yaesu FT-920 is being used. Select ICOM and the IC-756PRO on the Configuration dialog box. Then, click the desired calibration or dB/S Unit button. These new dialogs will be displayed with IC-756PRO information. When you return to the Calibration dialog box, be sure to click Cancel so that the configuration does not change from the FT-920 to the IC-756PRO.
The dB Calibration button displays the Calibration dialog box for the currently selected radio.
The dB/S Unit Graph button displays the dB/S Unit Graph dialog box for the currently selected radio.
If you make changes to the configuration information, and you wish to save those changes, click OK to dismiss the dialog box. Clicking Cancel, or using any other mechanism to dismiss the dialog box will cause any changes to be discarded, and the configuration state will be as it was before the dialog box was created. The Help button brings up the HTML Help Viewer for the dialog box.
Calibration is the process of specifying the raw data values that correspond to the 16 points on each of the two scales, the S Unit and the dB scales. S Meter Lite comes with calibration information that was experimentally obtained from the radios that I had either direct or indirect access to. The same dialog box is used for both types of calibration. Conceptually, both scales are nothing more than 16 points with corresponding raw data values. You select either S Unit calibration or dB calibration on the Configuration dialog box. Once you are performing calibration for a given scale, you cannot change to the other scale without dismissing the Calibration dialog box and clicking the other calibration button on the Configuration dialog box.
If you do change the default calibration for your radio, I suggest that you keep a backup copy of the 32 (2 X 16) data points. This is an insurance policy again a computer failure where you might lose your data, including the calibration information saved in the system Registry.
This is the easier scale to calibrate since no additional test equipment is needed. You should perform this calibration if the S Meter indication shown by S Meter Lite does not agree with the actual S Meter on your radio.
The S Unit scale consists of 16 marker points. They are, S0, S1, S2, S3, S4, S5, S6, S7, S8, S9, +10, +20, +30, +40, +50, and +60. When your radio S Meter is exactly at one of those points it will respond with a corresponding raw data value when asked by the computer. Those 16 raw data values are the ones we want to capture and save in the program.
Conceptually, all we need to do is to force the radio S Meter to the 16 points and note the corresponding raw data value. For the radios in question, forcing the radio S Meter is easy, since the S Meter will deflect upwards in response to lowering the RF gain. So, my technique for S Unit scale calibration is to temporarily disconnect the antenna, and then adjust the RF gain control until each of the 16 marker points is reached. The specific details of using the dialog box are described below.
On analog meters, such as on the IC-756PRO, it is easy to rock the RF gain back and forth until the needle is right over the marker point. Radios with segmented bargraphs, however, are more difficult to calibrate. The goal is to find the point where the desired segment just illuminates. This takes some time and patience.
In order to perform dB scale calibration you will need a stable signal generator and a step attenuator.
The dB scale consists of 16 marker points, They are, -18, -16, -14, -12, -10, -8, -6, -4, -2, 0, +2, +4, +6, +8, +10, +12 (dB). By convention, 0 dB is the same raw data value as S9 on the S Unit scale. While this is highly suggested, and the scales will display the text S9, you are under no obligation to tie the dB scale to S9. If you wish to pick some other 0 dB point, and calibrate around it, you are free to do so. Simply ignore the S9 marker on the dB scale and consider it to be whatever 0 dB point you desire.
In dB calibration, the signal generator and step attenuator are used to present a signal with a known dB level difference from S9 to your radio. The dB differences should be the even values from -18 dB to +12 dB with S9 as 0 dB. These are the 16 maker points where you want to note the corresponding raw data values.
I find that dB calibration can be broken down into two pieces, one for the negative dB values, and the other for the positive dB values.
In the case of the negative values, I start off with the step attenuator at 0 dB. I adjust the RF generator to obtain an S9 level. At this point, you should actually look for the raw data value that corresponds to S9 since that is the true definition of S9 within S Meter Lite. I add 2 dB of attenuation. The raw data value at that point is the -2 dB value we are looking for. This process continues in steps of 2 dB until all of the points are mapped. I tend to go back to 0 dB in between points to verify that nothing has shifted, and that 0 dB attenuation is still S9.
For the case of positive dB values, I start off with more than 15 dB of attenuation selected. I adjust the signal generator for S9. I then remove 2 dB of attenuation to move the S Meter to the raw data value corresponding to +2dB. I continue to remove attenuation in units of 2 dB until I get to the last value of +12 dB.
Here is a screen capture of the common calibration dialog box that is used for S Unit and dB scale calibration. This example shows S Unit scale calibration. When performing dB scale calibration, the dialog box text is changed to reference dBs as opposed to S Units.
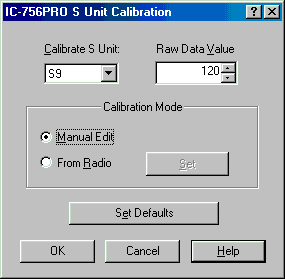
The dialog box title indicates the radio and the scale that is being calibrated. Please make sure that you are changing the desired data.
The drop-down list under the text: Calibrate S Unit contains a list of the 16 marker points. When you select a point, the edit control with attached up/down control under the Raw Data Value text will show the corresponding raw data value. At any time, you may manually edit this edit control, either with the keyboard, or through the up/down control.
The Manual Edit radio button should be clicked when you want to change the raw data values entirely through manual editing via the edit control.
The From Radio radio button should be clicked when you want the radio itself to supply the raw data values. When this button is pressed, S Meter Lite begins sampling the radio's S Meter at the standard 20 samples per second. This implies that in order to perform From Radio calibration you must have the radio connected to the computer and ready to go. If S Meter Lite cannot sample the radio, you will receive an error message in a few seconds, and it will not be possible to enter this calibration mode.
Assuming that the radio is ready, the text of the Set button will turn into Set = XXX, where XXX is the current raw data value. This value will be updated 20 times per second. Here is an example screen capture. Please note that this example shows dB scale calibration.
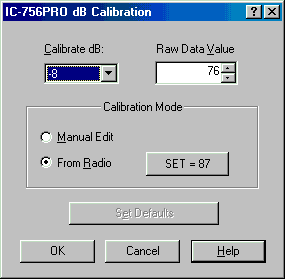
When the raw data value is correct and stable, click the Set button. This action will transfer the data from the Set button text to the raw data value edit control. In typical use, you will adjust the RF gain control (S Unit scale calibration) or step attenuator (dB scale calibration) until you have moved the radio S Meter to the required value. Click Set, and you will record that value.
The Set Defaults button will restore all 16 marker points to their default S Meter values.
When you are done with calibrating a scale, click the OK button to save your changes and dismiss the dialog box. At that time, a check is made to verify that each raw data value point is strictly increasing with respect to the point before it. This is a requirement. You cannot dismiss the calibration dialog so long as the data points are not strictly increasing. You can, however, Cancel the calibration dialog and discard all of the changes you may have made.
Let's consider an example. Assume that the raw data value for S5 is 110. The point after S5 is S6. The raw data value for S6 must be greater than 110. It cannot be equal to 110, it must be greater than 110.
By the way, when S Meter Lite is started, it will read any custom calibration information out of the system Registry. If that data is not strictly increasing, S Meter Lite will silently revert to its default values.
The Cancel button dismisses the dialog box without saving any changes. The Help button brings up the HTML Help Viewer for the dialog box.
All S Unit and dB scale calibration data that you change will be saved in your system Registry. If you want to move S Meter Lite to another computer, you will have to manually transfer the data, since there is no way to copy parts of the Registry.
Several factors influence the accuracy of the displayed data. Basic tracking of the S Meter is quite good, especially if you have calibrated the S Unit scale for your radio. Accuracy of the dB scale begins with calibration quality. Another factor to consider is the spacing and span of the raw data across the dB scale. The ICOM IC-706MIIG, for example, maps the entire -18 dB to +12 dB range from raw data values 100 to 161. So, a count difference of 61 represents 30 dB of change. Compare that to the ICOM IC-756PRO, where the same 30 dB range occurs across 146 counts. The 706 dB scale is much more compressed, and probably more susceptible to measurement and calibration errors.
Under most operating conditions, the main problem with making accurate readings is QSB and other signal instabilities.
A final note on accuracy. You may want to check to see if your radio's calibration is a function of variables such as frequency band, preamp, or attenuator. You may find that a given set of calibration values are only applicable for certain conditions. When I was developing S Meter Lite I spent some time measuring the S Meters of a number of radios. That information is available as a PDF document. In particular, the ICOM IC-756PRO changes calibration as a function of frequency and use of the preamp (and, therefore, attenuator). The default calibration for this radio is most accurate when the preamp and attenuator are not used.
S Meter Lite maintains two scales, one for S Units and the other for dBs. Since they are both based upon the same raw data, it is possible to relate one to the other. The dB/S Unit Graph dialog box shows that relationship. It maps the often inaccurate S Unit scale onto the more accurate (if calibrated) dB scale.
Shown below is an example taken from my IC-756PRO radio. This graph tells us that the +10 S Unit scale point is actually only +8 dB on the more accurate dB scale. Below S9, we find that S Units are never more than 3 dB, and the entire S0 to S9 scale is actually only about 18 true dB of difference. This may be quite shocking if you think that an S Unit is some number of fixed dBs. In writing this program I became interested in the accuracy of S Meters, in general, and that information is available on a web page.
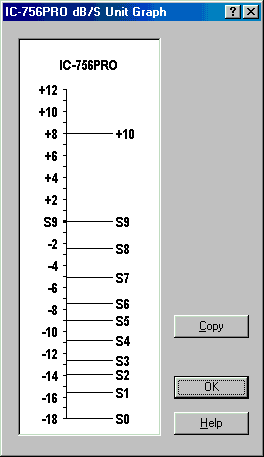
The Copy button places a copy of the comparison graph on the system Clipboard. Use the Paste command in another application to retrieve the bitmap.
The OK button dismisses the dialog box, and the Help button brings up the HTML Help Viewer for the dialog box.
Last update:Monday, October 13, 2003 06:01:50 PM
Back to the S Meter Lite Home Page